
Regardless of the photographer’s experience, the quality of the camera’s lens, lighting, and location, raw studio images are not enough to leave a lasting impression on the audience. Even the best-captured pictures in professional settings are retouched and beautified to make them appealing. This is why photo retouching has become an indispensable profession over the years.
Before you start retouching your photos, you need to be proficient in high-end photo editing software like Photoshop. Secondly, you also have to be more creative, as technical skills alone will not be enough when it comes to photo editing and retouching.
If you love to retouch your images on your own, following these tips and tricks might be helpful for you:
-
Start with a flat image

Image Source:- https://www.photozworld.com/blog/7-photo-retouching-tips-to-upscale-your-photography/
The best way to get started is to build a base for a picture before retouching and flattening your raw images with proper color temperature and exposure.
Start with adding a slight dullness to your highlights and flatness to the shadow areas.
Adding dullness and flatness is crucial. This is because whenever you apply retouching techniques to images with natural contrast, you are likely to overdo the contrast, ending up ruining the image.
You should also check the image’s tonal range but match it with the mid-tones. This makes your image flat and dull so that you can apply different retouching techniques in Photoshop or any other software; the image will have the right amount of contrast.
-
Use a healing brush instead spot a healing brush to Remove spots and scars
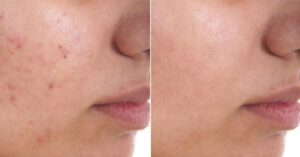
Image Source:- https://www.photozworld.com/blog/7-photo-retouching-tips-to-upscale-your-photography/
Healing brush is the default healing tool in Photoshop. The spot healing brush tool allows you to clone areas and remove blemishes from the face in a single click. In a spot healing brush, you don’t need a source point as it replaces the pixel from nearby colors. Although it sounds easy and hassle-free, this may not be a great idea to retouch professional-grade portrait photos.
Professional retouching requires excellent attention to detail, and a healing brush allows you to pick your own source points to remove the tiniest inconsistencies and imperfections on the skin and background.
-
Use frequency separation to smoothen out wrinkles

Image Source:- https://fashionmingle.com/15-photo-retouching-tips-for-fashion-pros/
The frequency separation is a great tool to remove wrinkles and fine lines from the skin. It works by separating high-frequency pixels from low ones, allowing one to manipulate each pixel individually. You can add details and modify textures ranging from colors to tones. This tool is also ideal for smoothening backdrops, clothes, skies, and anything that needs to be smoothed out.
With this tool, you can change skin tone without manipulating the colors and shades of other objects within the picture. Both layers of the image will be under your control, and manipulating one won’t affect the whole picture.
Sometimes artists tend to overdo it, making the picture appear fake. Moderation is the key here. Don’t try to make the skin too perfect, as people don’t tend to believe in pictures when they see flawless skin, hair, and bodies. Sometimes, a little imperfection can be a good thing.
-
Learn to blend perfectly using the clone stamp tool
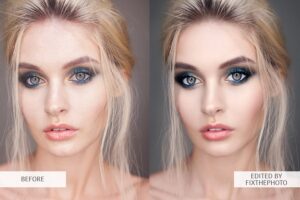
Image Source:- https://fashionmingle.com/15-photo-retouching-tips-for-fashion-pros/
The clone stamp tool can be beneficial if you don’t want to go overboard and make the skin appear clear without losing its aesthetics. You don’t need to manipulate any pixels you do with frequency separation and still get faster results. However, you need to be extra cautious and not use areas that don’t have enough natural light or details.
It allows you to blend transitions flawlessly, especially on patterns that don’t have adequate details, such as the sky. The clone stamp tool comes with different blending modes, giving you more room to try them. Make sure you don’t use this with frequency separation or make the image look completely fake.
If the skin tone appears rough or textured, you can use the clone brush tool at low opacity and flow with 30% each with a soft brush. Select the wilder areas of the skin and apply the tool with the right skin tone. This helps you smoothen out a rough texture without destroying the pixels.
-
Don’t zoom too far while using the Dodge and Burn tool
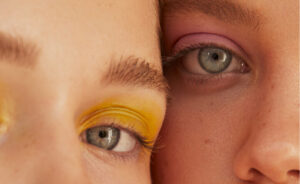
Image source:- https://affinityspotlight.com/article/7-tips-for-natural-looking-beauty-retouching/
Dodge and burn is an easy-to-use technique to retouch a picture without destroying the skin texture. The tool uses light and dark tones to rectify blemishes, lines, uneven skin tones, and other elements.
The best way to do this is by using two curve adjustment layers, including one brighter and one darker, followed by a paintbrush with 1% flow to retouch the image. The only problem with this tool is that it’s too easy to go too far or spend too much time on a single area if you are not experienced in working with detail-oriented tools.
Therefore, try not to zoom too close as you may focus on tiny things that the naked eye cannot see. As a result, you may make the skin appear overly smooth to the point it looks waxy.
You don’t need to retouch every single pixel for a natural effect. Besides that, the dodge and burn tool is excellent for turning two-dimensional images into three-dimensional using the curve adjustment layer.
-
Try Digital Make Up

Image Source:- https://fashionmingle.com/15-photo-retouching-tips-for-fashion-pros/
Sometimes pictures don’t come as expected, even with perfect makeup. This is where digital makeup can save the day.
Use the following Photoshop face retouching techniques to experiment with digital makeup:
- Use the red channel to sharpen images
- Use patch and clone stamp tools to rectify under-eye dark circles
- Make sure the foundation tone of the face matches other body parts
- Smoothen wrinkles using the healing brush and clone stamp tools
- Improve irises using the radial filter
-
Master your toning skills
You can give a vibrant and realistic appeal to any dull image with the right tone, color balance, and hue/sat adjustments.
Use the color balance adjustment layer in the following way:
- Use blue, cyan, or magenta in the shadows
- Use red or yellow tone to highlight an image
- Use red, green, or yellow on the mid-tones
You can also add a level adjustment layer to experiment with exciting concepts. Adding some blue and green shadows can give the image a film look. Don’t forget to use the hue/sat tool to fine-tune the colors to get the perfect color balance.